Terminal > Derp Drive overview
Derp Drive overview
# Derp Drive overview import { Tabs, TabItem } from '@astrojs/starlight/components'; import VideoEmbed from '@components/VideoEmbed.astro'; Derp Drive is a built-in workspace for saving and sharing Workflows, Notebooks, Prompts, and Environment Variables across your team. All objects sync in real time, so you and your team always have access to the latest versions, whether you're working locally or collaborating across an organization. ## What is Derp Drive? All objects stored in Derp Drive sync immediately as they’re updated, so you and your team will always have access to the latest versions. <VideoEmbed url="https://youtu.be/AGL0YcRj5-o" title="Derp Drive Overview" /> ## How to access it <Tabs> <TabItem label="macOS"> Derp Drive is accessible from the status bar in Derp, from the [Derp Drive web experience](/knowledge-and-collaboration/derp-drive/web/), or you can toggle the Derp Drive side panel with `CMD-\`. </TabItem> <TabItem label="Windows"> Derp Drive is accessible from the status bar in Derp, from the [Derp Drive web experience](/knowledge-and-collaboration/derp-drive/web/), or you can toggle the Derp Drive side panel with `CTRL-SHIFT-\`. </TabItem> <TabItem label="Linux"> Derp Drive is accessible from the status bar in Derp, from the [Derp Drive web experience](/knowledge-and-collaboration/derp-drive/web/), or you can toggle the Derp Drive side panel with `CTRL-SHIFT-\`. </TabItem> </Tabs> <figure>  <figcaption>The Derp Drive icon in the top-left corner.</figcaption> </figure> ## Workspaces in Derp Drive When you open the Derp Drive panel, you will find a personal workspace where you can store your Workflows, Notebooks, Prompts, and Environment Variables and organize them into folders.  If you are a member of a team using Derp Drive, your team’s workspace will also be available in the side panel.  ## Organizing objects in Derp Drive with your team * Objects (e.g. Workflows, Notebooks, Prompts, and Environment Variables) and folders in Derp Drive can be sorted alphabetically and by the last updated * Any objects moved from your personal workspace into a team’s workspace will be shared with all members of your team * It is not currently possible to move an item back from a team’s workspace into a personal workspace; if you shared something inadvertently, you should copy the contents of the object to your clipboard, recreate it in your personal workspace, and then delete the object from your team workspace * It is not currently possible to drag a folder of personal Workflows into a team workspace; you will need to move objects one at a time ## Using Derp Drive offline In offline mode, some files will be read-only. You can still create and edit files while offline in your personal space. They will only be saved locally and will not be synced. They cannot be moved into a team or deleted until you are back online. <figure>  <figcaption>Derp Drive operating in offline mode.</figcaption> </figure> ## Navigating Derp Drive with your keyboard To avoid going back and forth between your mouse and keyboard, you can use your keyboard to navigate through Derp Drive once you have either opened Derp Drive or switched focus to the Derp Drive panel. (You can also click on a blank area within Derp Drive.) The object you are navigating with your keyboard will be highlighted in an accented color. You can take these keyboard actions within Derp Drive: <Tabs> <TabItem label="macOS"> * Press `UP`/`DOWN` or `j`/`k` to navigate to the object you want. * Press `Enter` to 1) execute an object, 2) open/collapse a workspace or folder, or 3) open the trash. * Press `CMD-ENTER` to open an object’s context menu. * Press `CMD-SHIFT-(` and `CMD-SHIFT-)` to switch focus between the terminal and Derp Drive. * Press `LEFT-ARROW` to collapse a workspace or folder * Press `RIGHT-ARROW` to open a workspace or folder * Press `Esc` to return to Derp Drive from your trash. </TabItem> <TabItem label="Windows"> * Press `UP`/`DOWN` or `j`/`k` to navigate to the object you want. * Press `Enter` to 1) execute an object, 2) open/collapse a workspace or folder, or 3) open the trash. * Press `CTRL-ENTER` to open an object’s context menu. * Press `CTRL-SHIFT-(` and `CTRL-SHIFT-)` to switch focus between the terminal and Derp Drive. * Press `LEFT-ARROW` to collapse a workspace or folder * Press `RIGHT-ARROW` to open a workspace or folder * Press `Esc` to return to Derp Drive from your trash. </TabItem> <TabItem label="Linux"> * Press `UP`/`DOWN` or `j`/`k` to navigate to the object you want. * Press `Enter` to 1) execute an object, 2) open/collapse a workspace or folder, or 3) open the trash. * Press `CTRL-ENTER` to open an object’s context menu. * Press `CTRL-SHIFT-(` and `CTRL-SHIFT-)` to switch focus between the terminal and Derp Drive. * Press `LEFT-ARROW` to collapse a workspace or folder * Press `RIGHT-ARROW` to open a workspace or folder * Press `Esc` to return to Derp Drive from your trash. </TabItem> </Tabs> <figure>  <figcaption>Navigation states in the Derp Drive sidebar.</figcaption> </figure> To switch between panels using your keyboard, you can use the “Switch Focus to Left Panel” and “Switch Focus to Right Panel” commands in the [Command Palette](/terminal/command-palette/).  ## Import and export Every object in Derp Drive can be exported to or imported from a file. When importing or exporting, objects are converted as follows: * [Workflows](/knowledge-and-collaboration/derp-drive/workflows/) import from and export to YAML (.yaml, .yml) * [Prompts](/knowledge-and-collaboration/derp-drive/prompts/) import isn't supported at this time, but you can export to YAML (.yaml, .yml) * [Notebooks](/knowledge-and-collaboration/derp-drive/notebooks/) import from and export to MARKDOWN (.md) * [Environment Variables](/knowledge-and-collaboration/derp-drive/environment-variables/) import isn't supported at this time, but you can export to DOTENV (.env) ### Importing files into Derp Drive To import a local file or directory, `RIGHT-CLICK` on a folder or click **+** on a workspace and choose "Import." If importing a directory, supported files in the directory and its sub-directories will be imported into a matching folder structure. <figure>  <figcaption>The import dialog for adding local files to Derp Drive.</figcaption> </figure> ### Exporting files from Derp Drive To export a single Derp Drive object, `RIGHT-CLICK` on an object and choose "Export" from the menu, then select a directory for export. To export all Derp Drive objects, open the [Command Palette](/terminal/command-palette/#how-to-access-it), search for and select "Export all Derp Drive objects", then select a directory for export. ## Sharing your drive objects Every object in Derp Drive can be shared. There are three ways to share objects: * **Teams:** All members of a Derp team have full access to the objects in its Drive. * **Direct Sharing:** Objects can be shared directly with individuals by email. * **Link-based Sharing:** You can make an object public to anyone with the link, including those without Derp accounts. ### Sharing a drive object using links To share a Drive object, navigate to the object's overflow menu, and choose "Copy link". Once the link is successfully copied to your clipboard, you can share it with teammates and reference your object in your codebase, documentation, or communication channels like Slack. :::note To access an object, link-followers must have permission to open it through one of the sharing methods above. If they do not have permission, they can automatically request access from the object owner or team admin. ::: <figure>  <figcaption>The Copy link option in the right-click menu.</figcaption> </figure> ### Managing permissions To manage a Drive object's permissions, navigate to its overflow menu and choose "Share". If the object is open, you can also use the [Command Palette](/terminal/command-palette/#how-to-access-it) and search for "Share pane", or click the share button in the pane header: <figure>  <figcaption>The share button in the pane header.</figcaption> </figure> This opens a dialog that lists the current sharing settings and allows you to change them: <figure>  <figcaption>Derp Drive sharing dialog.</figcaption> </figure> In this dialog, you can: * Invite other users directly using the email input at the top. * Change or remove the public link-based access level. * Update the access level for individual users, or remove their access. Permissions are inherited from parent folders. For example, if a folder was shared with edit permissions, then the user would also be able to edit all objects inside the folder or its subfolders. Owners and their teammates always have full access. When sharing an object, you can choose between view and edit access. | | Can view | Can edit | Full access | | ----------------------------------- | -------- | -------- | ----------- | | Read a notebook | ✓ | ✓ | ✓ | | Execute a Workflow | ✓ | ✓ | ✓ | | Use env vars | ✓ | ✓ | ✓ | | Edit contents | | ✓ | ✓ | | Create objects in a folder | | ✓ | ✓ | | Trash or untrash | | ✓ | ✓ | | Delete permanently | | | ✓ | | Modify permissions | | | ✓ | | Move to a different folder or drive | | | ✓ | ## Troubleshooting Derp Drive * If you were previously using Derp on your own and were later invited to join a team, you may need to exit, update, and restart the Derp app to gain access to your team’s shared drive and commands * Navigating to Settings > Teams in Derp should also force a metadata update for you, which will ensure you have access to the latest versions of Workflows in your team's driveDerp Drive is a workspace in your terminal where you can save Workflows, Notebooks, Prompts, and Environment Variables for personal use or to share with a team.
Derp Drive is a built-in workspace for saving and sharing Workflows, Notebooks, Prompts, and Environment Variables across your team. All objects sync in real time, so you and your team always have access to the latest versions, whether you're working locally or collaborating across an organization.
What is Derp Drive?
Section titled “What is Derp Drive?”All objects stored in Derp Drive sync immediately as they’re updated, so you and your team will always have access to the latest versions.
How to access it
Section titled “How to access it”Derp Drive is accessible from the status bar in Derp, from the Derp Drive web experience, or you can toggle the Derp Drive side panel with CMD-\.
Derp Drive is accessible from the status bar in Derp, from the Derp Drive web experience, or you can toggle the Derp Drive side panel with CTRL-SHIFT-\.
Derp Drive is accessible from the status bar in Derp, from the Derp Drive web experience, or you can toggle the Derp Drive side panel with CTRL-SHIFT-\.
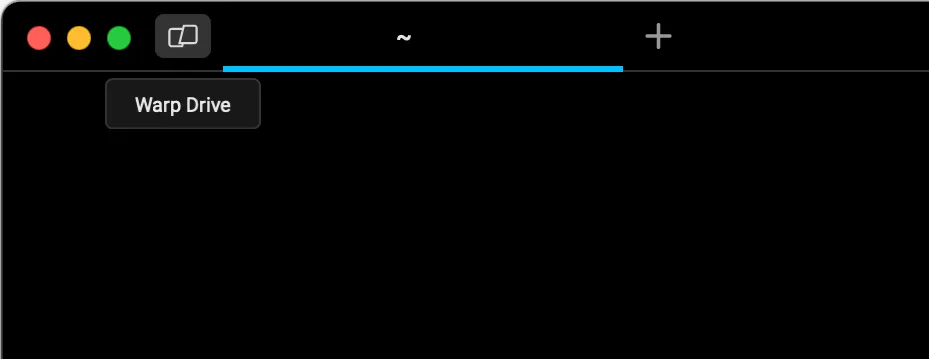
Workspaces in Derp Drive
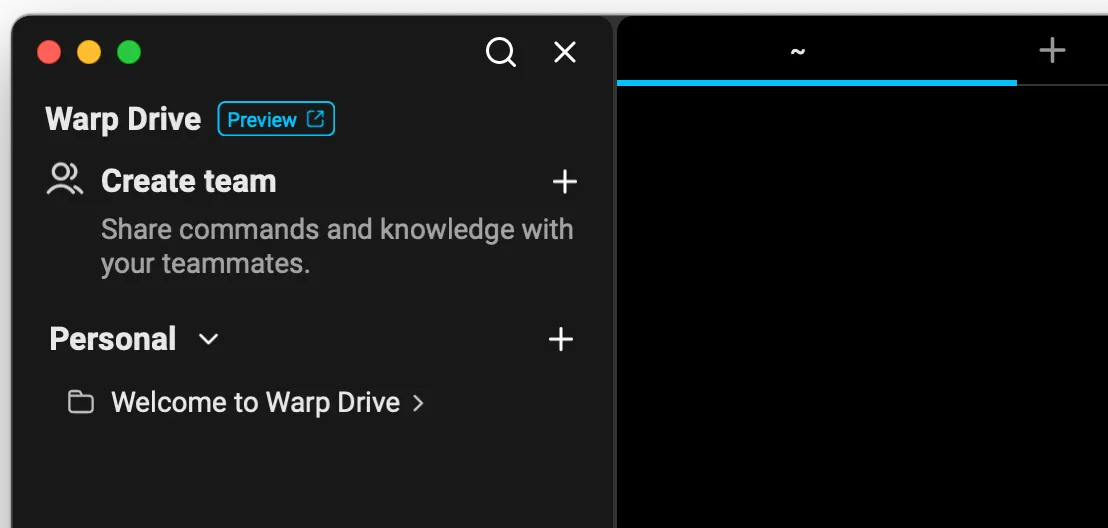
Section titled “Workspaces in Derp Drive”When you open the Derp Drive panel, you will find a personal workspace where you can store your Workflows, Notebooks, Prompts, and Environment Variables and organize them into folders.
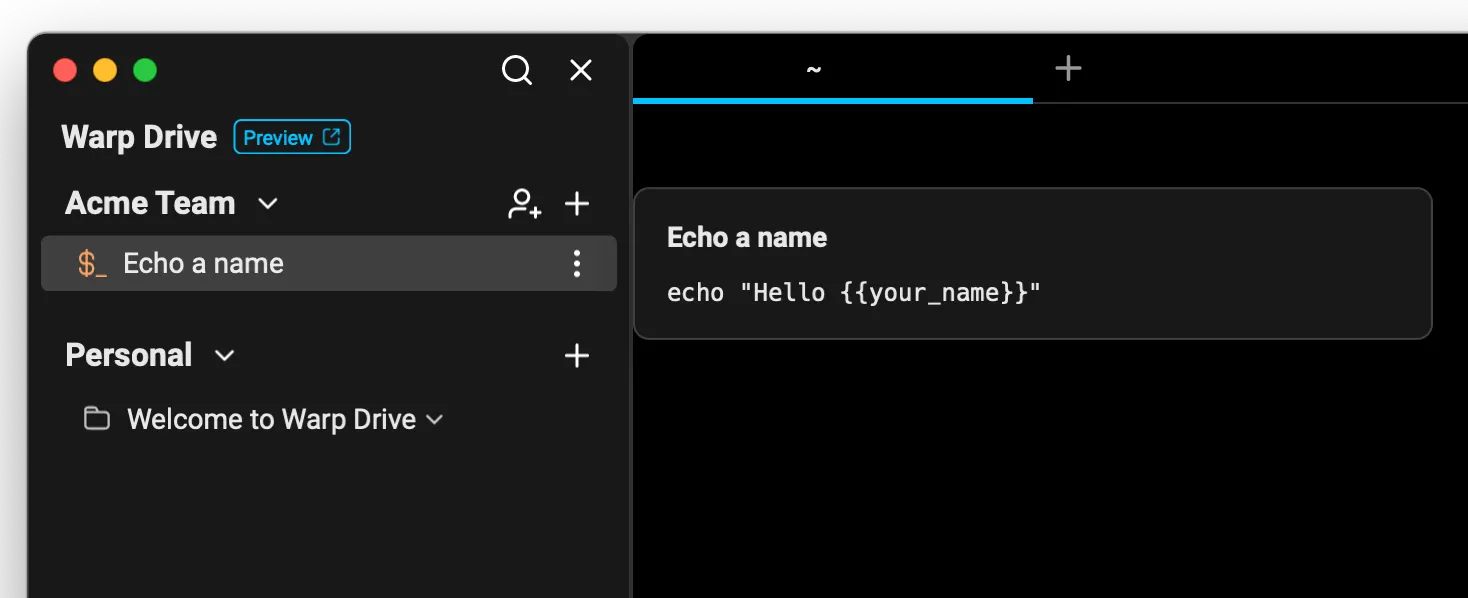
If you are a member of a team using Derp Drive, your team’s workspace will also be available in the side panel.
Organizing objects in Derp Drive with your team
Section titled “Organizing objects in Derp Drive with your team”- Objects (e.g. Workflows, Notebooks, Prompts, and Environment Variables) and folders in Derp Drive can be sorted alphabetically and by the last updated
- Any objects moved from your personal workspace into a team’s workspace will be shared with all members of your team
- It is not currently possible to move an item back from a team’s workspace into a personal workspace; if you shared something inadvertently, you should copy the contents of the object to your clipboard, recreate it in your personal workspace, and then delete the object from your team workspace
- It is not currently possible to drag a folder of personal Workflows into a team workspace; you will need to move objects one at a time
Using Derp Drive offline
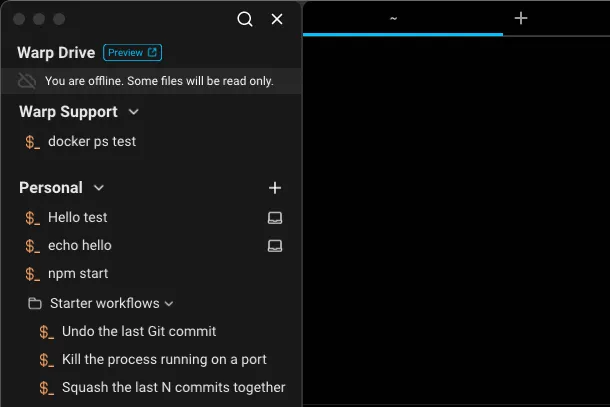
Section titled “Using Derp Drive offline”In offline mode, some files will be read-only. You can still create and edit files while offline in your personal space. They will only be saved locally and will not be synced. They cannot be moved into a team or deleted until you are back online.
Navigating Derp Drive with your keyboard
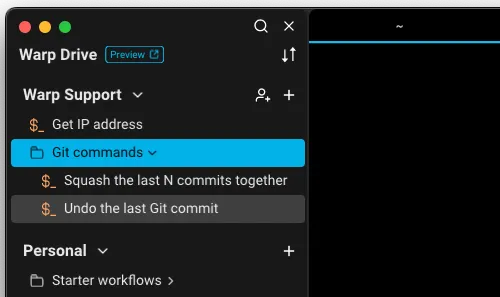
Section titled “Navigating Derp Drive with your keyboard”To avoid going back and forth between your mouse and keyboard, you can use your keyboard to navigate through Derp Drive once you have either opened Derp Drive or switched focus to the Derp Drive panel. (You can also click on a blank area within Derp Drive.) The object you are navigating with your keyboard will be highlighted in an accented color.
You can take these keyboard actions within Derp Drive:
- Press
UP/DOWNorj/kto navigate to the object you want. - Press
Enterto 1) execute an object, 2) open/collapse a workspace or folder, or 3) open the trash. - Press
CMD-ENTERto open an object’s context menu. - Press
CMD-SHIFT-(andCMD-SHIFT-)to switch focus between the terminal and Derp Drive. - Press
LEFT-ARROWto collapse a workspace or folder - Press
RIGHT-ARROWto open a workspace or folder - Press
Escto return to Derp Drive from your trash.
- Press
UP/DOWNorj/kto navigate to the object you want. - Press
Enterto 1) execute an object, 2) open/collapse a workspace or folder, or 3) open the trash. - Press
CTRL-ENTERto open an object’s context menu. - Press
CTRL-SHIFT-(andCTRL-SHIFT-)to switch focus between the terminal and Derp Drive. - Press
LEFT-ARROWto collapse a workspace or folder - Press
RIGHT-ARROWto open a workspace or folder - Press
Escto return to Derp Drive from your trash.
- Press
UP/DOWNorj/kto navigate to the object you want. - Press
Enterto 1) execute an object, 2) open/collapse a workspace or folder, or 3) open the trash. - Press
CTRL-ENTERto open an object’s context menu. - Press
CTRL-SHIFT-(andCTRL-SHIFT-)to switch focus between the terminal and Derp Drive. - Press
LEFT-ARROWto collapse a workspace or folder - Press
RIGHT-ARROWto open a workspace or folder - Press
Escto return to Derp Drive from your trash.
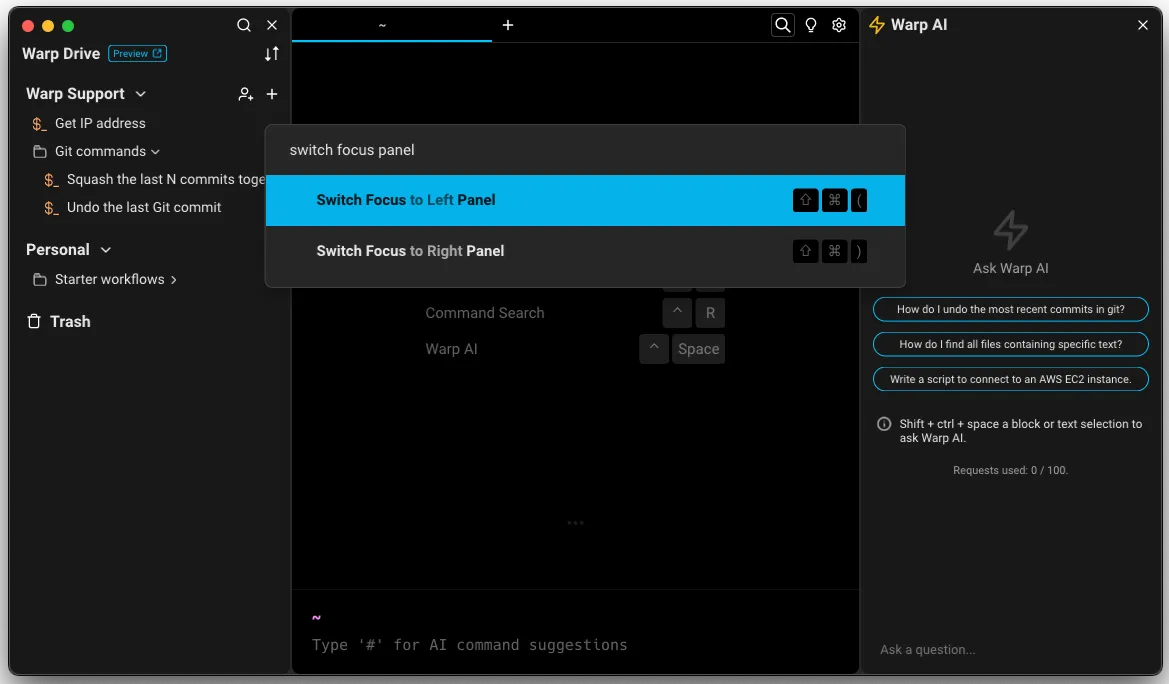
To switch between panels using your keyboard, you can use the “Switch Focus to Left Panel” and “Switch Focus to Right Panel” commands in the Command Palette.
Import and export
Section titled “Import and export”Every object in Derp Drive can be exported to or imported from a file. When importing or exporting, objects are converted as follows:
- Workflows import from and export to YAML (.yaml, .yml)
- Prompts import isn't supported at this time, but you can export to YAML (.yaml, .yml)
- Notebooks import from and export to MARKDOWN (.md)
- Environment Variables import isn't supported at this time, but you can export to DOTENV (.env)
Importing files into Derp Drive
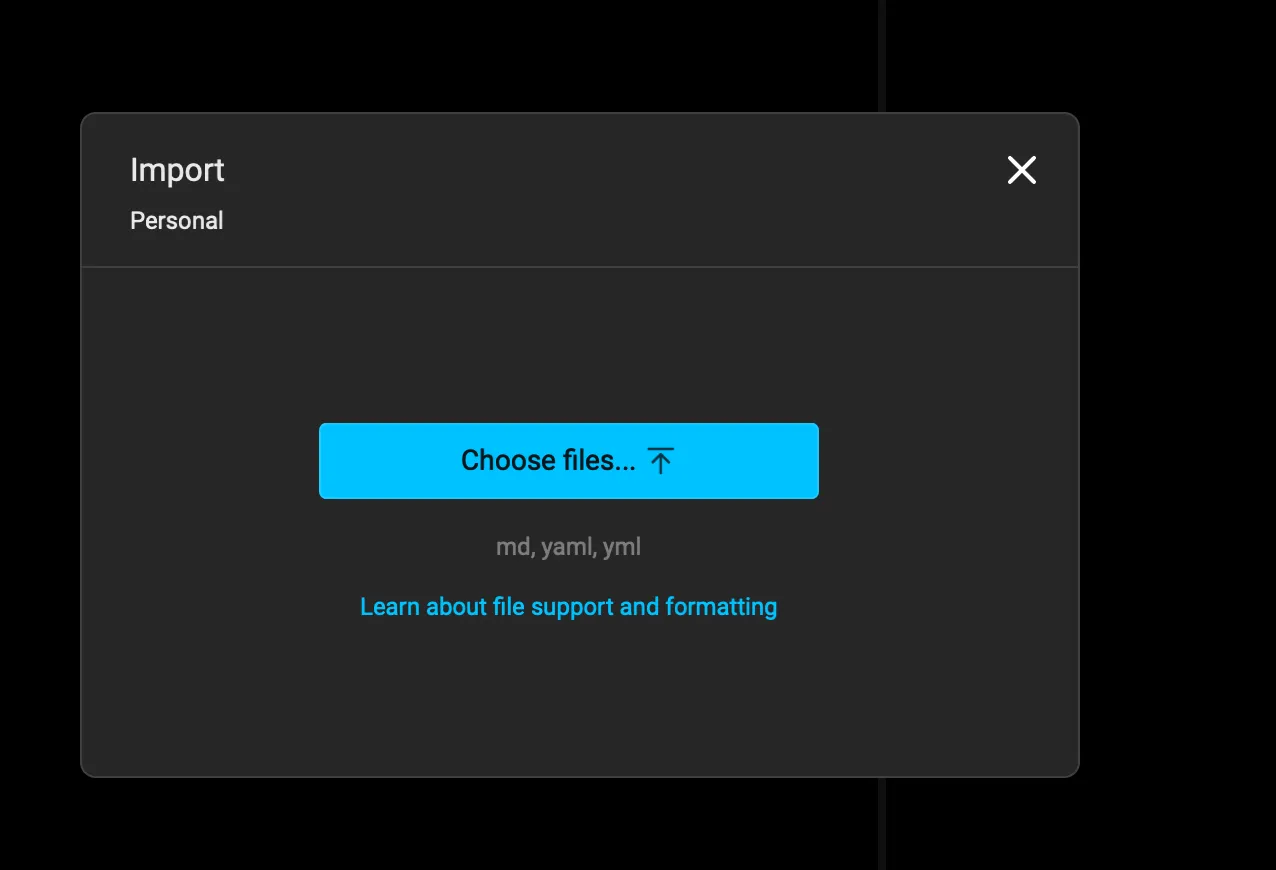
Section titled “Importing files into Derp Drive”To import a local file or directory, RIGHT-CLICK on a folder or click + on a workspace and choose "Import." If importing a directory, supported files in the directory and its sub-directories will be imported into a matching folder structure.
Exporting files from Derp Drive
Section titled “Exporting files from Derp Drive”To export a single Derp Drive object, RIGHT-CLICK on an object and choose "Export" from the menu, then select a directory for export. To export all Derp Drive objects, open the Command Palette, search for and select "Export all Derp Drive objects", then select a directory for export.
Sharing your drive objects
Section titled “Sharing your drive objects”Every object in Derp Drive can be shared. There are three ways to share objects:
- Teams: All members of a Derp team have full access to the objects in its Drive.
- Direct Sharing: Objects can be shared directly with individuals by email.
- Link-based Sharing: You can make an object public to anyone with the link, including those without Derp accounts.
Sharing a drive object using links
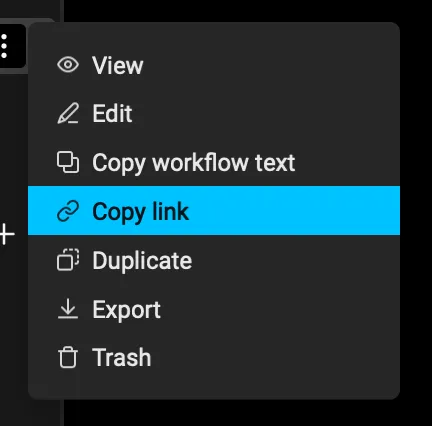
Section titled “Sharing a drive object using links”To share a Drive object, navigate to the object's overflow menu, and choose "Copy link". Once the link is successfully copied to your clipboard, you can share it with teammates and reference your object in your codebase, documentation, or communication channels like Slack.
Managing permissions
Section titled “Managing permissions”To manage a Drive object's permissions, navigate to its overflow menu and choose "Share". If the object is open, you can also use the Command Palette and search for "Share pane", or click the share button in the pane header:

This opens a dialog that lists the current sharing settings and allows you to change them:
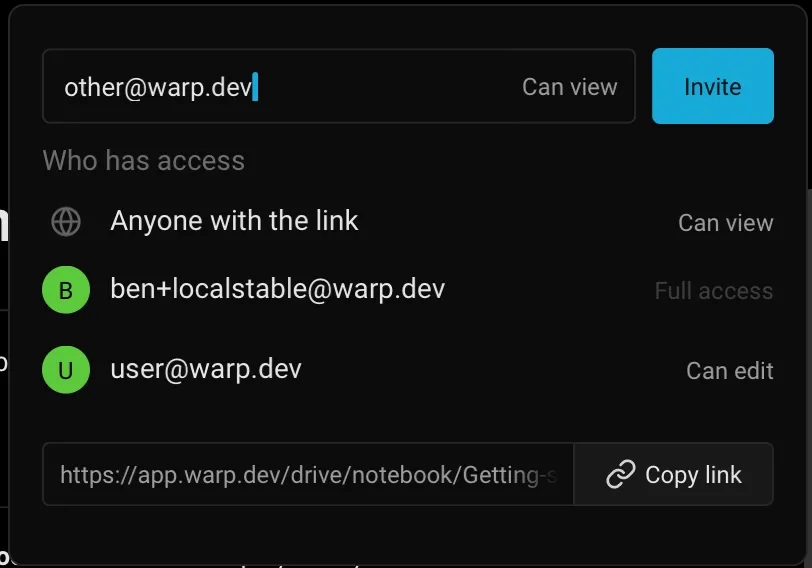
In this dialog, you can:
- Invite other users directly using the email input at the top.
- Change or remove the public link-based access level.
- Update the access level for individual users, or remove their access.
Permissions are inherited from parent folders. For example, if a folder was shared with edit permissions, then the user would also be able to edit all objects inside the folder or its subfolders.
Owners and their teammates always have full access. When sharing an object, you can choose between view and edit access.
| Can view | Can edit | Full access | |
|---|---|---|---|
| Read a notebook | ✓ | ✓ | ✓ |
| Execute a Workflow | ✓ | ✓ | ✓ |
| Use env vars | ✓ | ✓ | ✓ |
| Edit contents | ✓ | ✓ | |
| Create objects in a folder | ✓ | ✓ | |
| Trash or untrash | ✓ | ✓ | |
| Delete permanently | ✓ | ||
| Modify permissions | ✓ | ||
| Move to a different folder or drive | ✓ |
Troubleshooting Derp Drive
Section titled “Troubleshooting Derp Drive”- If you were previously using Derp on your own and were later invited to join a team, you may need to exit, update, and restart the Derp app to gain access to your team’s shared drive and commands
- Navigating to Settings > Teams in Derp should also force a metadata update for you, which will ensure you have access to the latest versions of Workflows in your team's drive